November 15, 2026 · 10 min read
Drag-and-Drop Kitchen Design Is Ready! CabinetWizard
Build an L kitchen wall by wall by dragging: sink, hob, fridge, corner, top cabinets and worktop. CabinetWizard's kitchen plan, step by step.
A kitchen is the job where a cabinet shop moves the most numbers around: two walls, a corner, sink, hob, fridge, worktop, plinth and a row of wall units on top. In CabinetWizard's kitchen plan you build all of it by dragging from the palette on the left onto the wall, and the worktop, plinth and corner fit themselves. Here's how we build an L-shaped kitchen from start to finish with drag and drop, and what rules the program applies in the background.
What's on the kitchen plan screen?
The kitchen plan window has six tabs across the top: Walls, Dimensions, Drag & Drop, From above, Section and Output. In Walls you set the shape (straight, L or U) and wall lengths; Dimensions holds values like worktop height and wall unit height; Drag & Drop is where you place cabinets; From above and Section show the plan from overhead and in cross-section; Output gives you the drawing sheets.
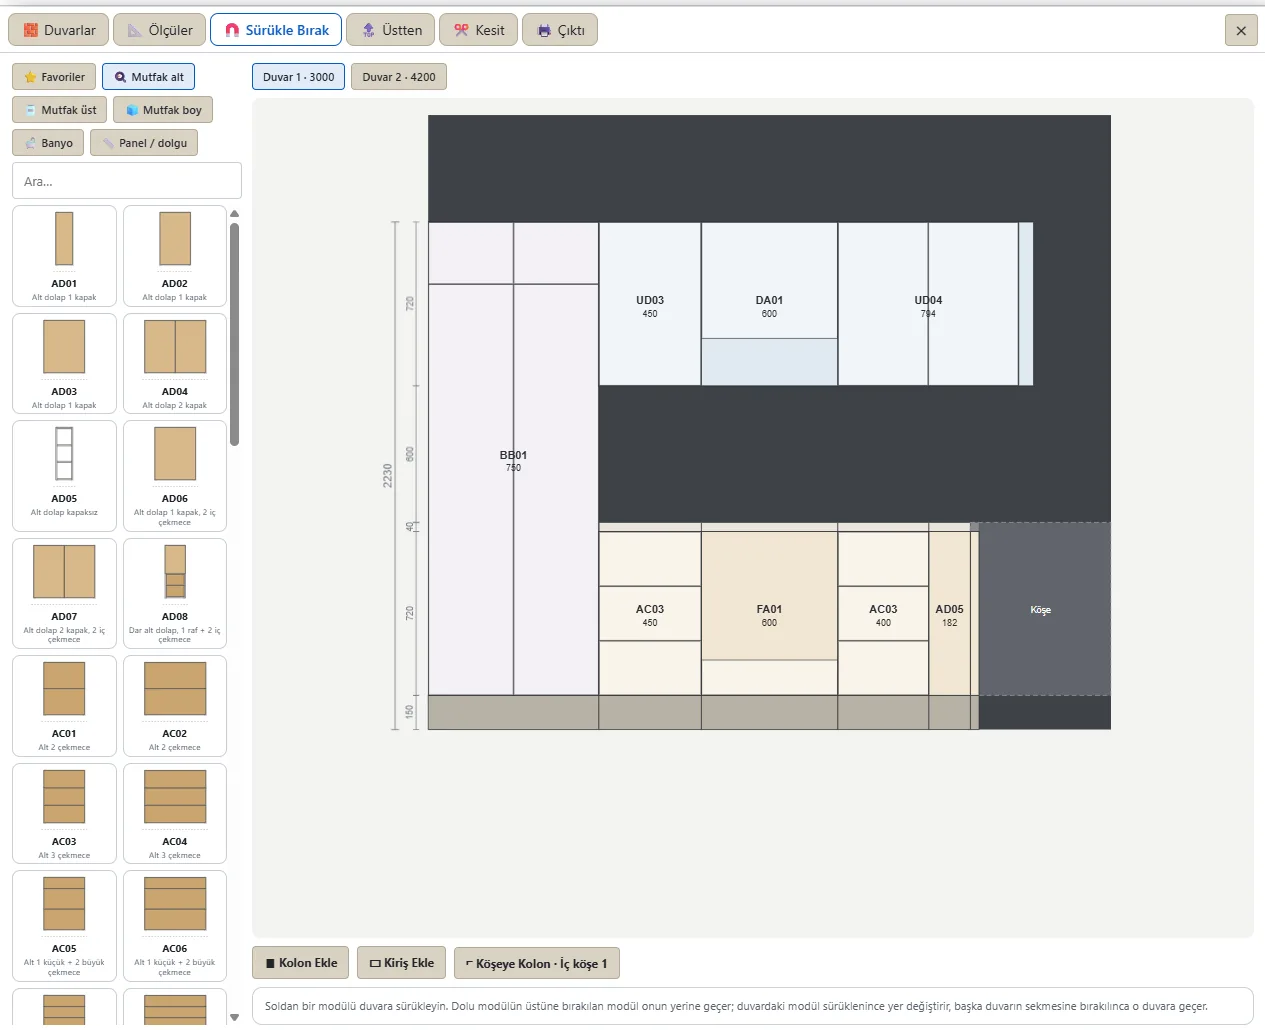
The palette in Drag & Drop has Favourites, Kitchen base, Kitchen wall, Kitchen tall, Bathroom and Panel / filler groups. Wall tabs sit at the top, for example "Wall 1 · 3000" and "Wall 2 · 4200". Whichever wall tab is open, you work on that wall's elevation, and every module you drop shows its code and width on it.
Example: dragging together a 3000 × 4200 mm L kitchen
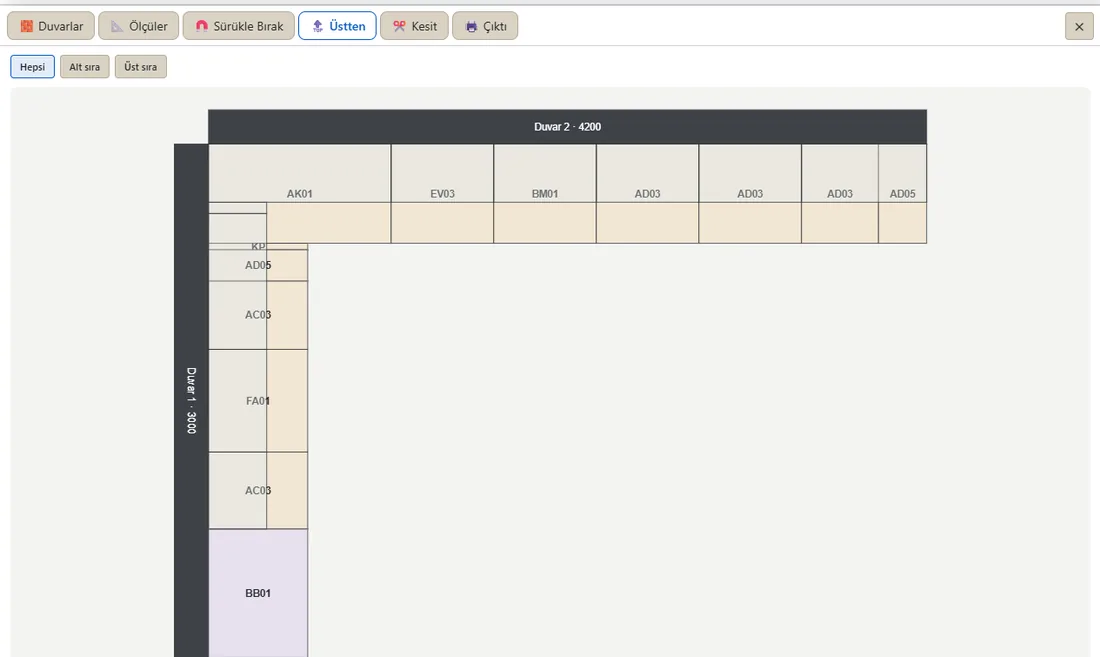
We have an L kitchen made of a 3000 mm wall and a 4200 mm wall. First, in the Walls tab, we pick L and enter the two lengths. Then we switch to Drag & Drop.
- Tall unit: from Kitchen tall we drop the BB01 built-in fridge unit at the left end of Wall 1.
- Base row: from Kitchen base we drag a 450 mm AC03 drawer unit, then a 600 mm FA01 oven housing, then a 400 mm AC03. Each one butts up against the one before.
- Corner: where Wall 1 meets Wall 2 is marked as the corner; the corner unit is built there.
- Wall 2: we click the "Wall 2 · 4200" tab and line up the EV03 sink base, the BM01 dishwasher and 600 mm AD03 base units.
- Wall row: from Kitchen wall we drop UD wall units and the DA01 hood unit above the hob.
Changed your mind? No need to delete. Drop a new module on an occupied one and it takes its place. Drag a cabinet along the wall and it stops where it meets its neighbour ("Stopped at the neighbour"); drag past the neighbour's middle and they swap. A module dropped on another wall's tab moves to that wall.
What do drag-and-drop modules sort out on their own in a kitchen?
Drag-and-drop modules, the ready kitchen cabinets you move from the palette to the wall, aren't just boxes; they're real parts sized to kitchen rules. Kitchen modules in the library come with an 870 mm under-worktop height (770 mm carcass + 100 mm legs) and wall units 1490 mm off the floor (580 mm between worktop and wall unit). That's part of the program's parametric dimensions logic: the worktop gap, leg height or carcass depth is a variable, and every part tied to it is recalculated.
- Worktop run: gaps between cabinets, inside corners and recess steps are closed with one continuous worktop; it's only cut at tall units and doors.
- Plinth: in L and U corners the plinth turns without a break and the door fronts meet. Don't want a plinth under one module? Choose "No plinth" on it and the neighbours' plinth ends there.
- Top cabinets and crown: turn on 🔝 Top cabinet under Walls › Dimension standard and the space above wall and tall units is closed up to the ceiling. A 100 mm crown cover comes by default; 50 / 100 / 150 mm is one click. The top cabinet button is in Drag & Drop as well.
- Hood: no top cabinets are stacked over a chimney hood; the flue never cuts the beam, it makes an S in front of the beam up to the ceiling.
- Doors and windows: no cabinet goes where a door swings; add a window and the wall units in front of it are removed.
Where do the sink, hob and dishwasher go?
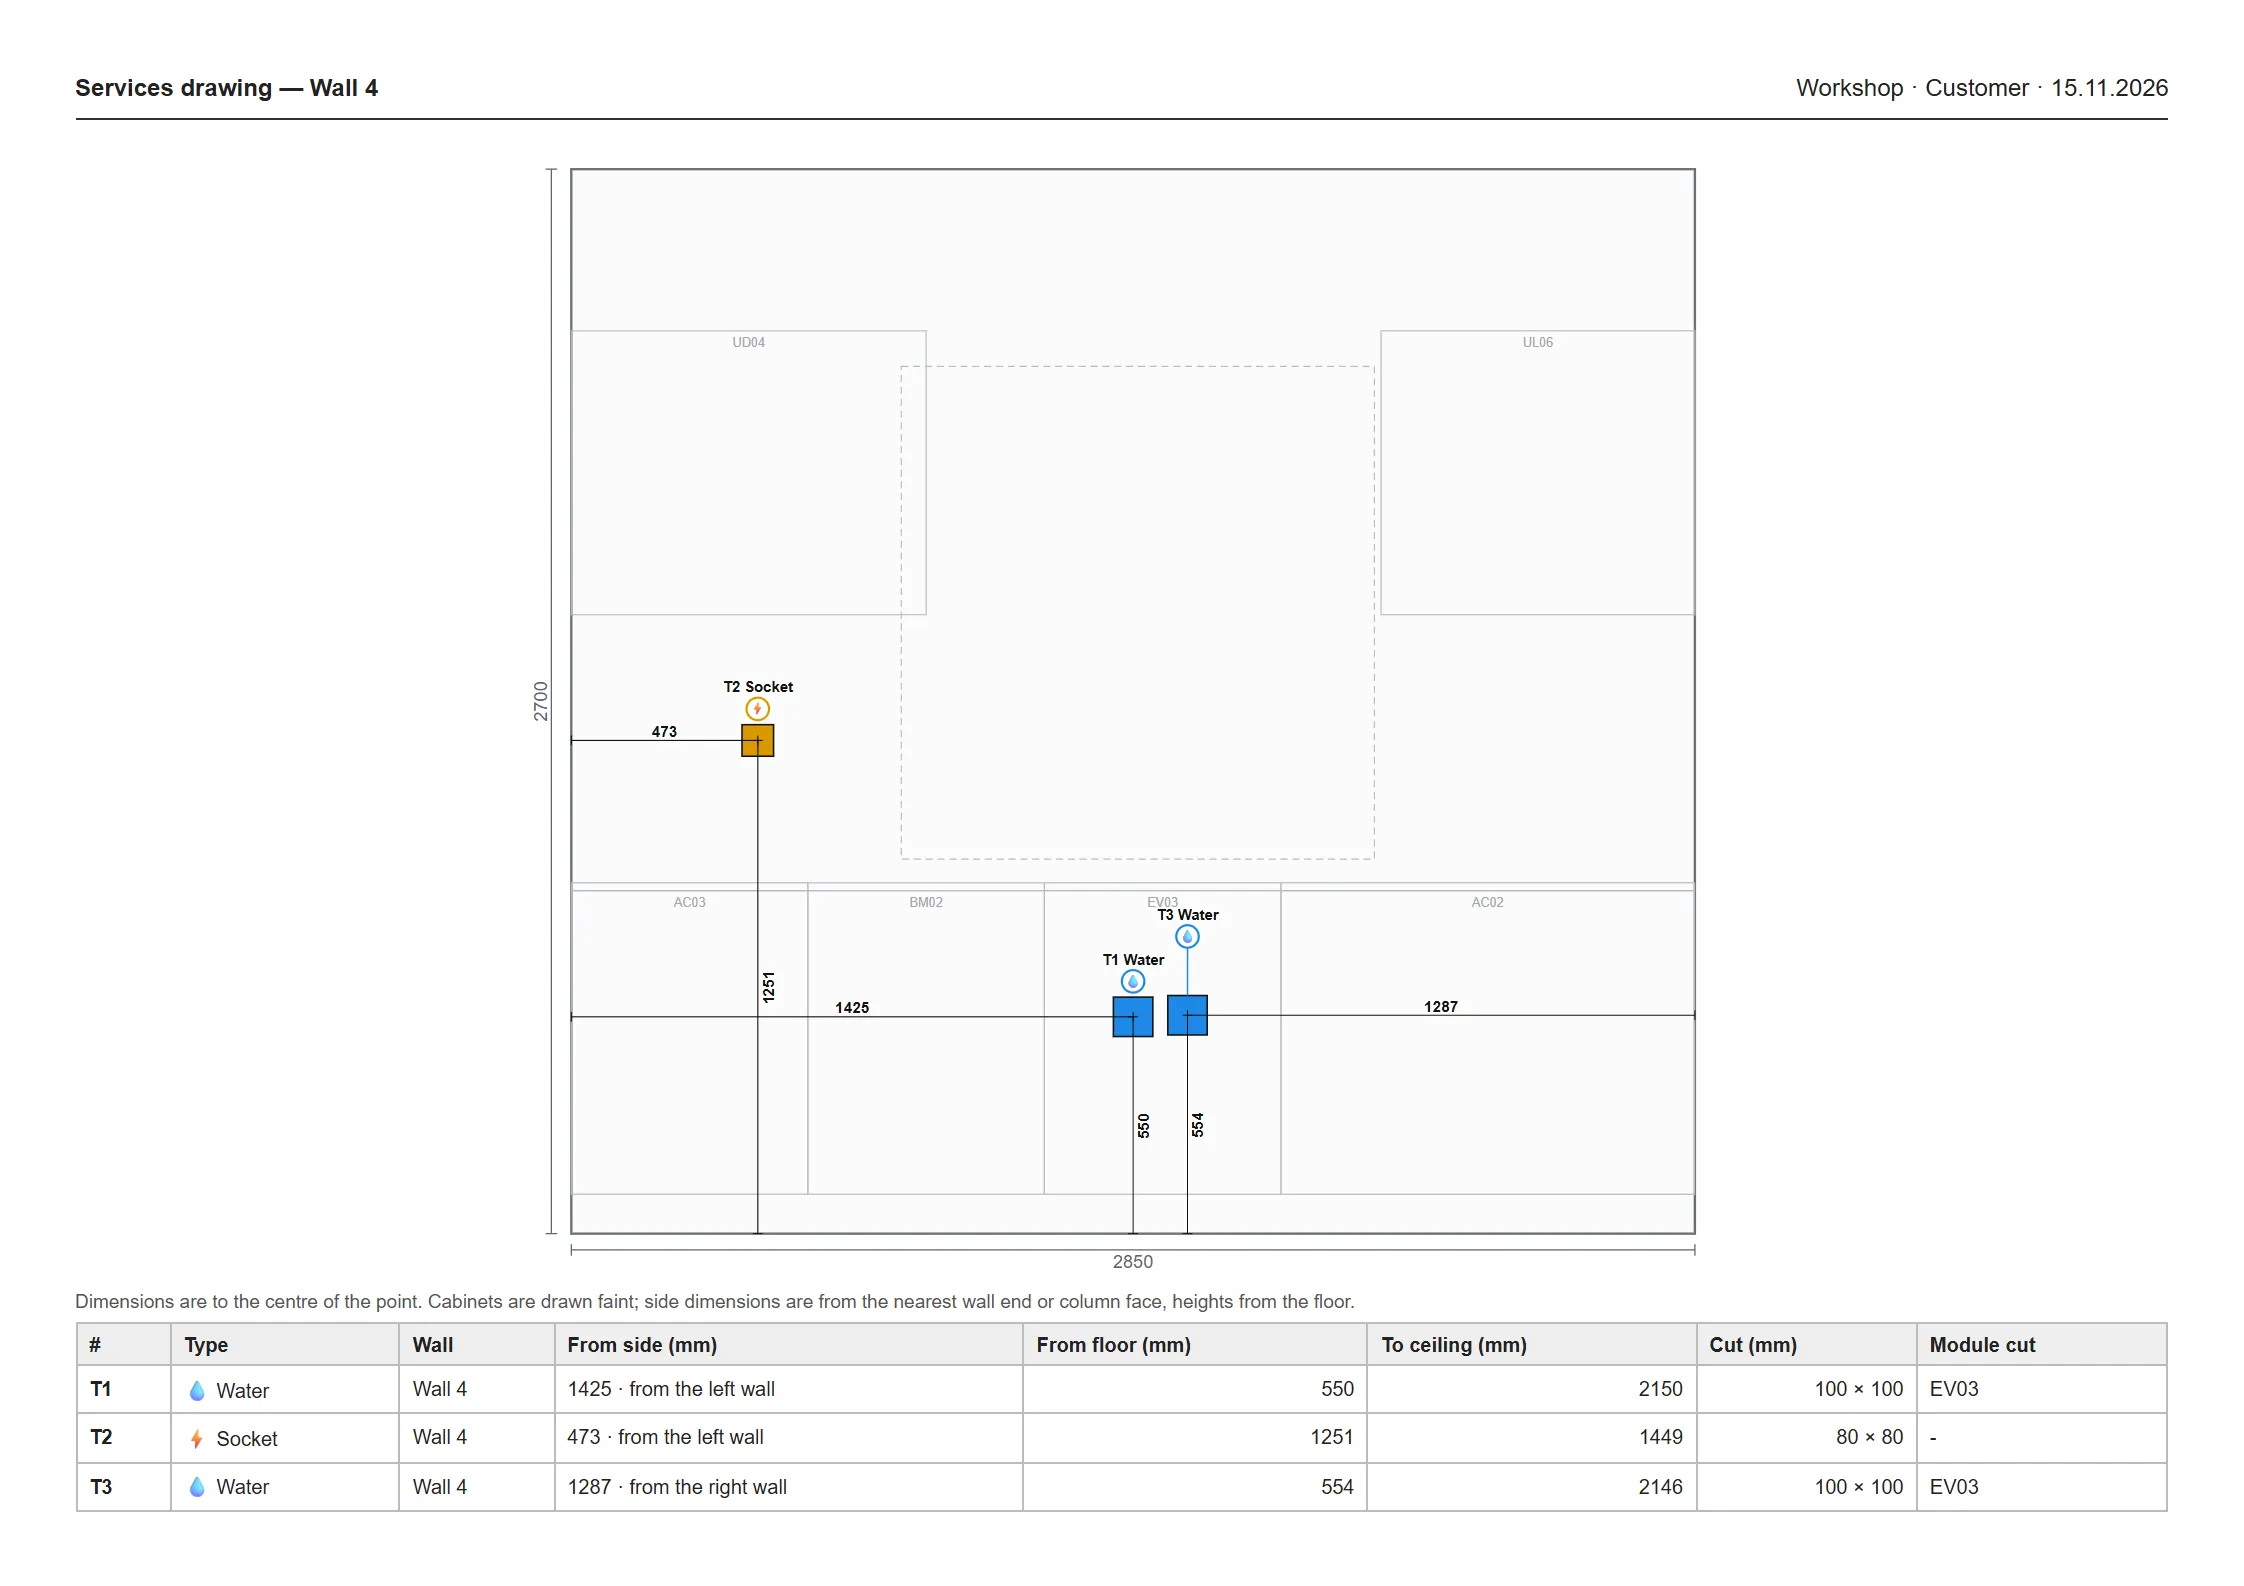
If you've entered service points, ⚡ Auto Place reads them: sink to the drain, hob to the gas, dishwasher on the side of the sink base that keeps the drain. We call this smart kitchen design: not connected appliances, but planning where cabinets place themselves around the door swing, services and columns. After layout, Output › 🔌 Services sheet gives the plumber and electrician numbered points with their dimensions.
Corners, columns and out-of-square walls
In L and U kitchens the corner gets its own solution. The library has blind corners (1050 / 1350, with a mechanism or a half-moon basket) and a 900 × 900 L corner. If the walls aren't square, you type the angle in Walls › ∠ Corner angles; each wall's cabinets follow their own wall, and the worktop is mitred on the bisector. At an angled corner you can choose two blind cabinets, a blind corner, open shelving or a cover panel only, separately for base and wall rows; a diagonal corner cabinet is the default.
A cabinet that meets a column is notched in place: the carcass is cut, notch panels go around it, the door stays put, and the worktop wraps around the column. With a recess or projection in the wall, every cabinet front stays on one line; if a 350 mm wall unit has a 100 mm projection behind it, it becomes 250 mm deep, and worktop and plinth run back to the wall behind. These rules are the same in the kitchen plan, the wizard, Drag & Drop and free placement. See columns and beams on video in the column section on the home page.
Editing the cabinet: door, handle, finish
The selected module's card holds width, hinge side, Copy and Delete. Ctrl+D puts a copy right next to it in the same row, wall row included. Click the leftover gap at the end of a wall and "Fill the remaining gap" offers one module, two equal modules or a standard module plus filler; under 300 mm it uses a filler only.
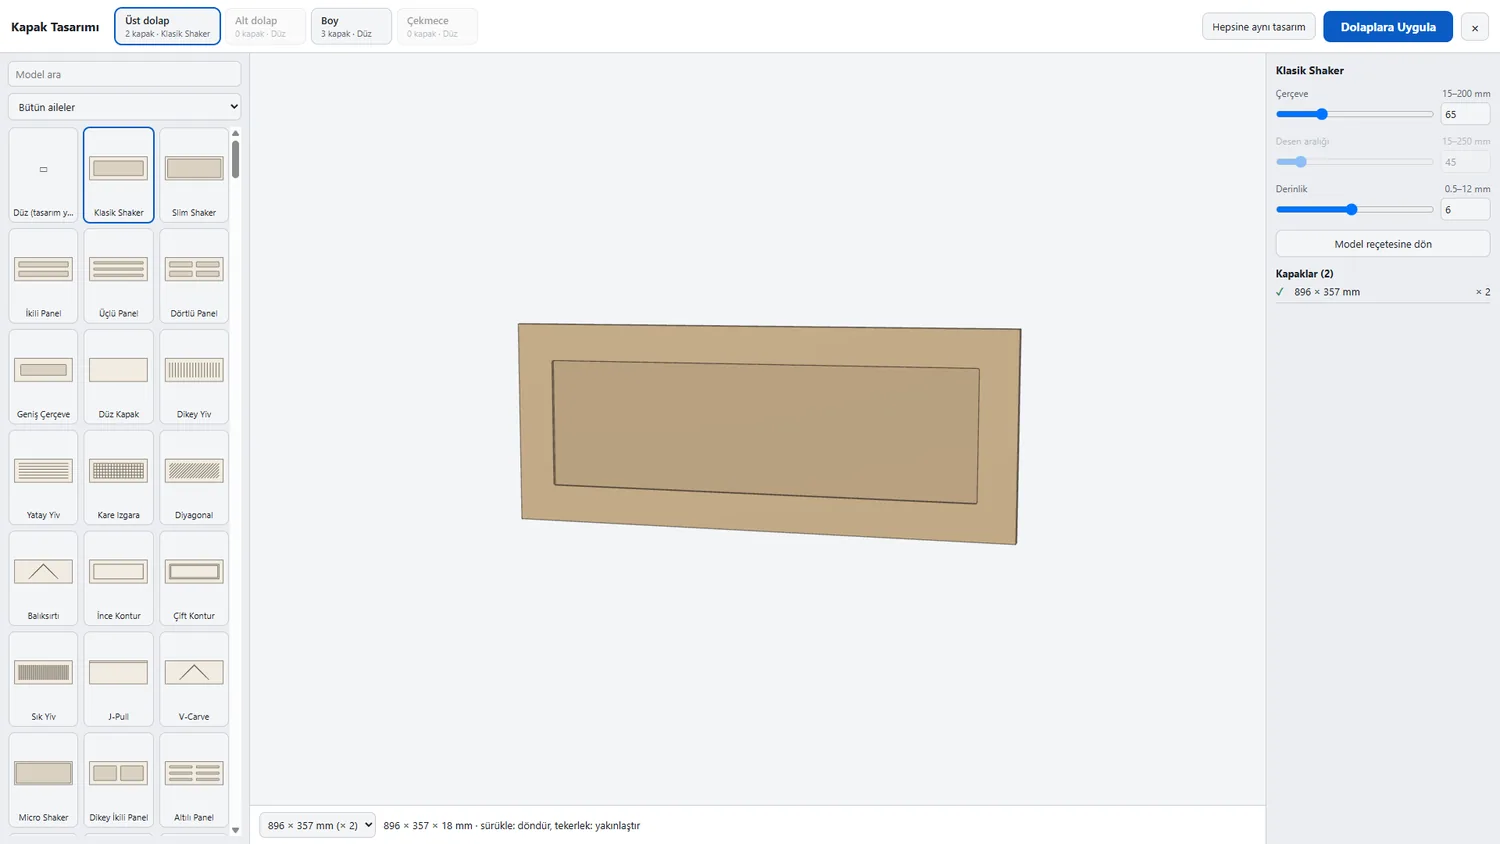
In the kitchen, the module card opens the 🎨 Door and handle window. Door styles, meaning whether the front is slab, framed or patterned, are picked from 386 door designs as thumbnails. Handle type and handle finish change in the same window, and ☑ Select similar applies them to every matching unit at once. Planning a handleless kitchen? You can give the gola profile per cabinet or to all cabinets. Since carcass and door materials are separate, a finish change, say from white lacquer doors to walnut, leaves the carcass alone and shows up in the cut list's material column.
Want to get inside a module? Double-click it; it opens on its own in the Assembly screen, you edit it panel by panel, and ↩ Back to kitchen brings you back.
From the kitchen to the cutting room
The real payoff of a drag-and-drop kitchen is that what you lined up on screen is the production list. When kitchen cabinetry design is done, modules placed on the walls and worktop and plinth in, the automatic cut list is ready too: part, quantity, cutting size, material and banding. That cut list has separate columns for grain direction, the way the board pattern runs on the part, and edge banding, the thickness of the PVC strip on the visible edge. Cover panels, plinth and crown share the grain of the doors; hidden edges stay unbanded.
The cutting plan is an automatic sheet layout showing how parts are spread across boards. On the CNC side the program does sheet nesting, arranging parts on the board with the least waste; door parts aren't rotated so the pattern stays intact. Then you export to CNC: one NC program per sheet, and a DXF that opens in your shop's CAM software. We call the pair the CNC/DXF output.
Behind it runs CabinetWizard's own CNC cutting and machining system: the Part Machining screen, a tool library and machine profiles. The generated code is read back and checked; if there's an error, no file comes out. That's what error-free CNC cutting means to us: the size you see in the kitchen plan goes to the label, the cut list and the machine file as the same number. For a shop doing CNC cabinetmaking, nobody types kitchen sizes a second time.
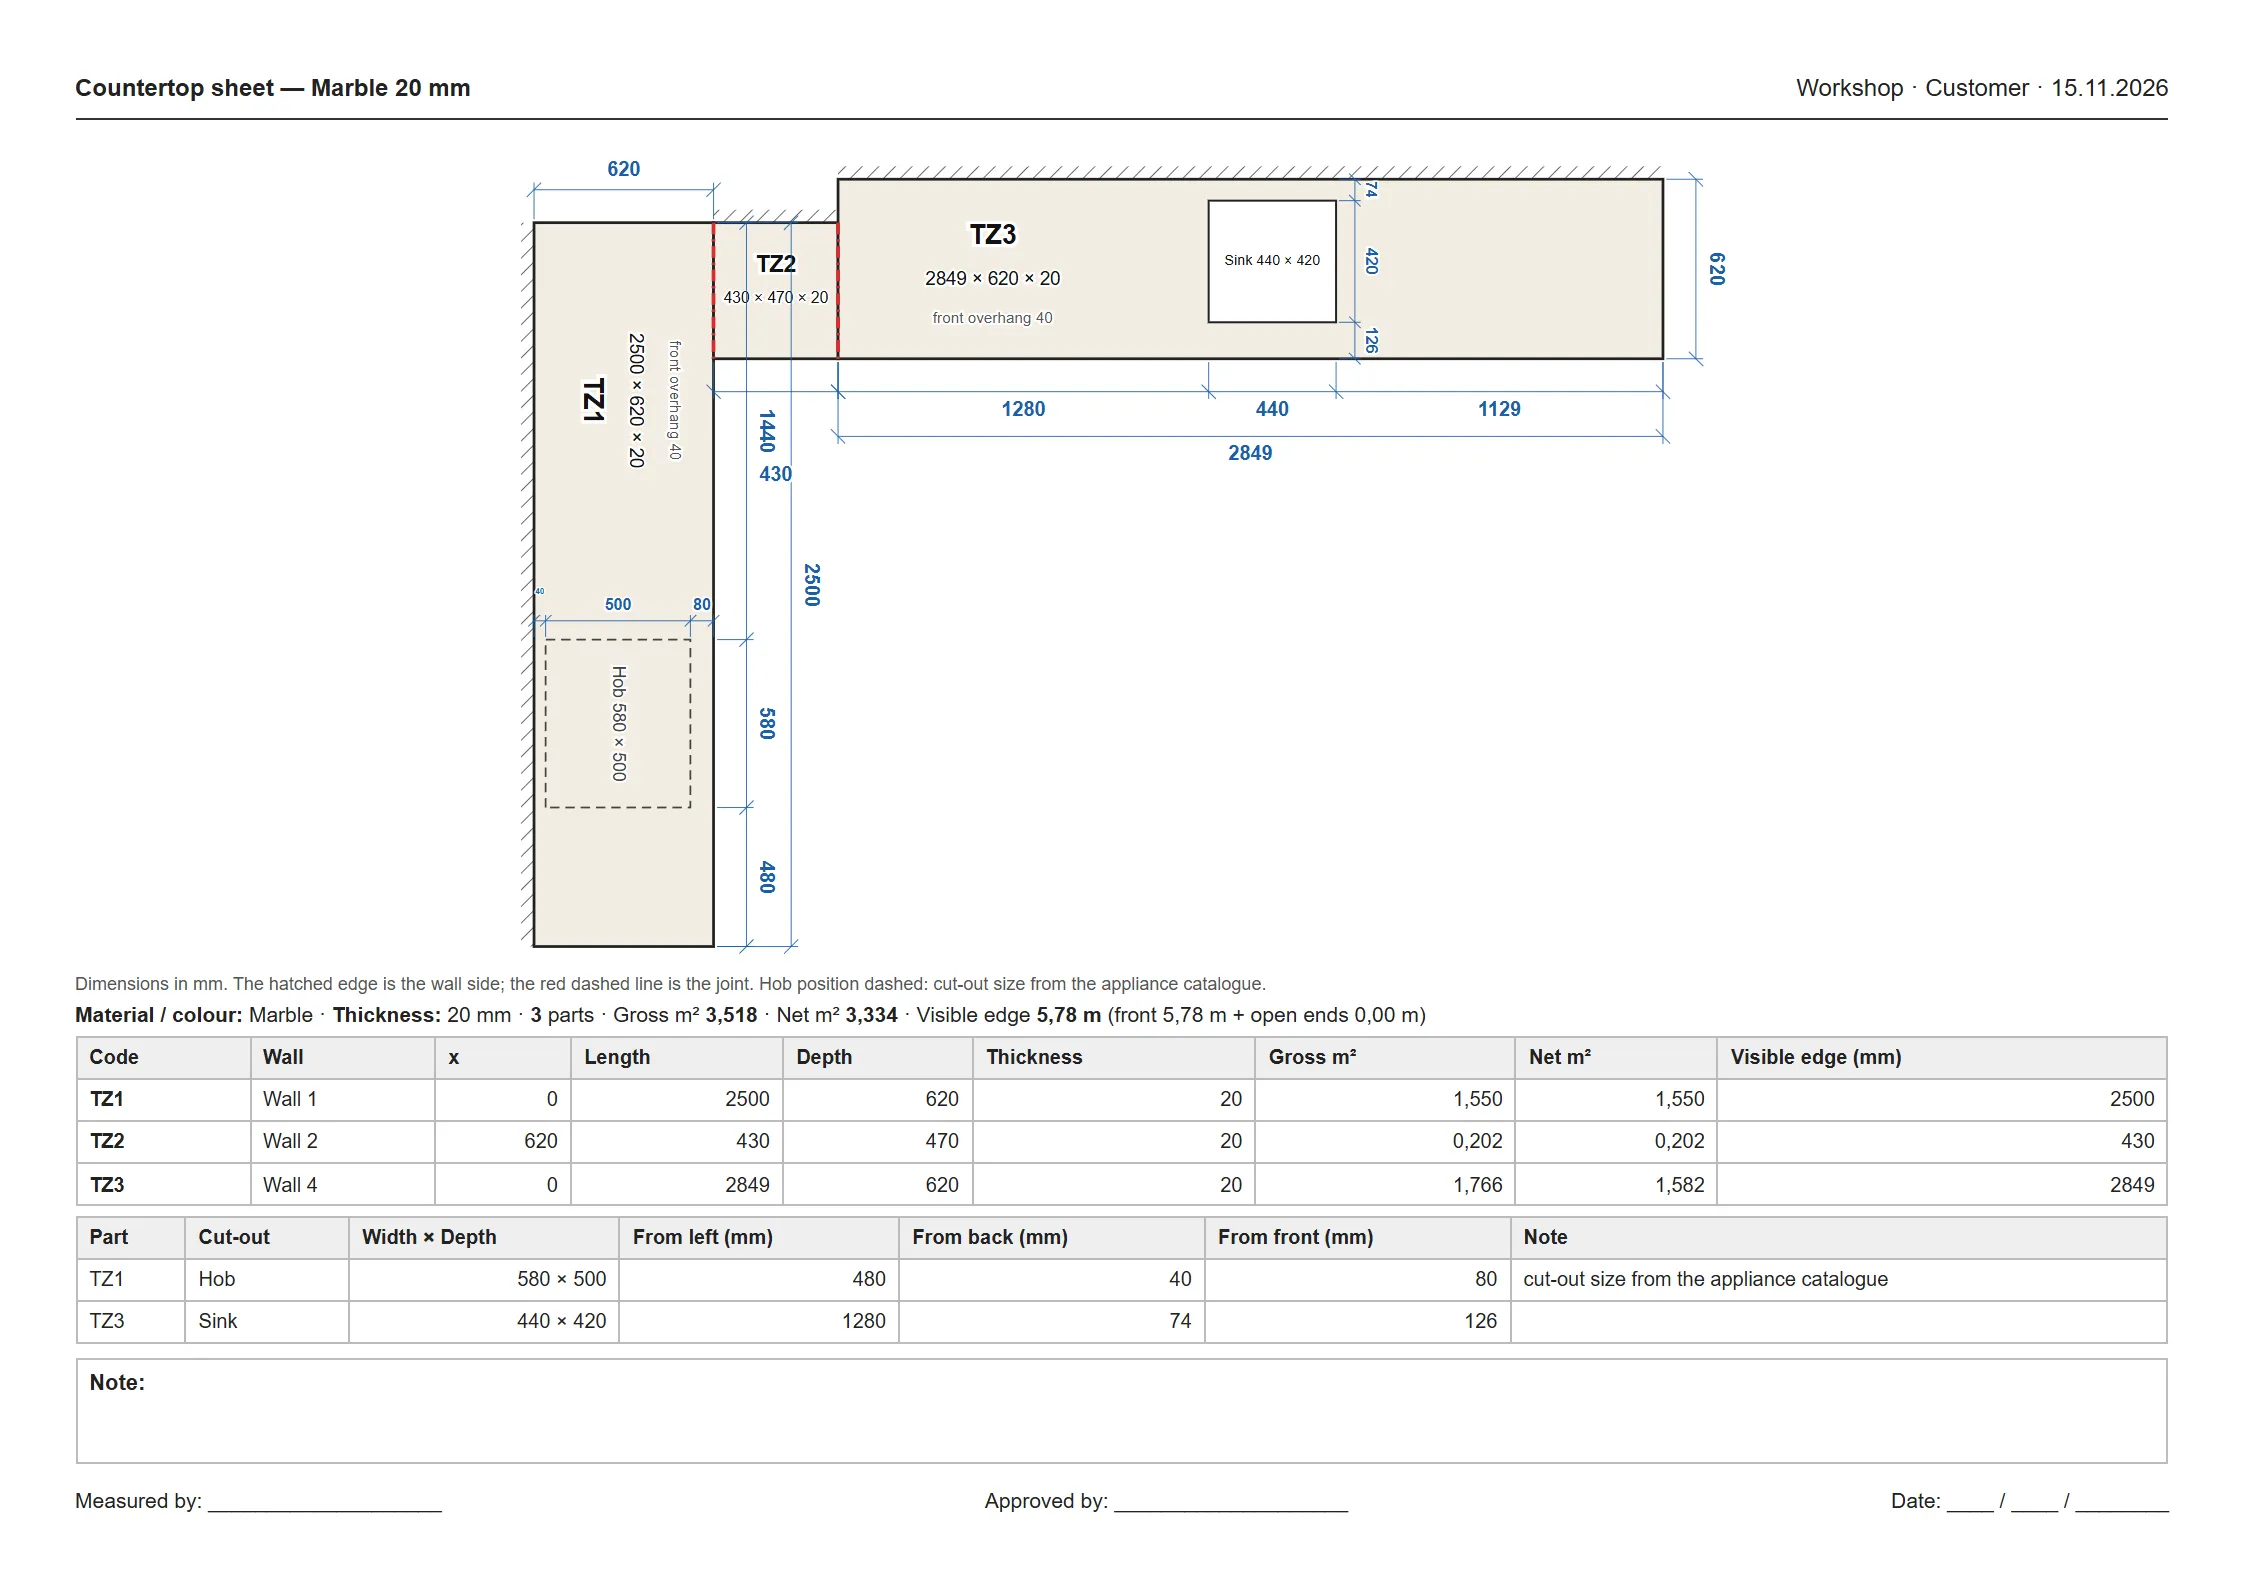
The customer-facing side comes from the same project: Output › 🪨 Worktop sheet gives the worktop fabricator a dimensioned plan, and the quote gives the customer a total in per-module or per-linear-metre price mode. For the program's own price, see the pricing section.
Speed, a dynamic plan and settings
By fast cabinet design we mean less about drawing a kitchen quickly and more about the drawing going to production without a second pair of hands. Time-saving cabinet design follows from that: you don't calculate the worktop length, plinth run or corner notch separately. As we say on the site, you go from kitchen design to the CNC cutting file in 15 minutes.
By dynamic kitchen design we mean a plan where cabinets re-arrange when a size changes and the front line holds. Add a projection to the wall and the cabinet gets shallower; add a ceiling beam and the wall unit is notched or shortened. This is driven by what we call a dynamic settings page: settings screens where changing a value recalculates the cabinets tied to it, such as Walls › Dimension standard, the Kitchen sizes section of Workshop Standards, and Machine Profile.
That's what parametric cabinet design means in a kitchen: a cabinet isn't a picture but a set of parts whose sizes are linked. Having it all in one window makes the program a cabinet design studio that needs no other software: design, 3D, rendering, quoting and production output in one place. If you'd rather build the kitchen question by question, we cover the wizard's five questions in Enter the Dimensions, CabinetWizard Does the Rest; for wardrobes and room layouts, see Drag-and-Drop Parametric Cabinet Layout.
Frequently asked questions
Can CabinetWizard design kitchen cabinets?
Yes. The kitchen plan, the five-question wizard, drag and drop, worktop sheet, services sheet, hood, L / U / angled corners and column and beam notching are all built in.
If I change a cabinet's width in a drag-and-drop kitchen, does the worktop change too?
Yes. Worktop and plinth are built from the cabinet run; change a width with the handle or by typing millimetres and the run is recalculated, with any gap closed by the worktop.
What about a U kitchen with two corners?
Each corner is built with its own corner solution; plinth and worktop turn both corners without a break. On out-of-square walls you type the angle in the Corner angles card.
Can I design a kitchen in the demo?
Yes. The free 5-day demo has design, 3D, rendering and project saving; production outputs like the cut list, cutting plan, NC, DXF, quote and labels are in the full version. More answers in 14 key questions.
By Ufuk Şen, developer of CabinetWizard