Cabinet Cut List Software: Draw the Cabinet, Get the Cut List
No counting parts, no edge banding math, no typing lists by hand. The moment you build the cabinet on screen, the cut list, sheet layout and labels are ready.
What does cut list software actually do?
A cut list, the table that tells the shop how many of each part to cut, at what size and from which material, is the real work order in a cabinet shop. Written by hand, it is a copy of the design, and it goes stale the moment the design changes. The customer bumps the sink base from 60 to 80 cm; you fix the drawing, but miss the bottom, rail, back or door in the list and the panel saw cuts the wrong parts.
In CabinetWizard the list is not a copy, it is the model itself. Every cabinet is built panel by panel, every panel is a real part, and the cut list is counted from those parts. If you just want to see the list for a single box, try our free browser-based cut list calculator first; the list for a whole kitchen or closet comes out of the program.
How is the automatic cut list built?
The list in the program is an automatic cut list: nobody counts parts, and when the design is done, so is the list. What makes this work is parametric dimensions, meaning every part is recalculated when the cabinet's width, height or depth changes. Take a 90 cm base cabinet down to 80 cm and the bottom, shelf, back and door shrink together; the list updates at the same time.
There is no "refresh list" button, because there is no separate list to refresh. Closet, entry unit, vanity or kitchen, every job produces the list in the same format. As we say on the site, you can go from design to the CNC cutting file in 15 minutes.
What information is in the cut list?
The Cut List window shows the same data in different views for different jobs:
- Detail: part, module, section, finished and cut size, grain, banding and hole file.
- Size, Size-Band, Size-Band-Groove: lean lists for whoever runs the saw or the edgebander.
- Profile: your own view, built by switching columns on and off.
A material code filter splits the list by role letter and thickness, such as carcass 18 mm, door 18 mm, back 8 mm. On the day the doors go to the paint shop, you filter to doors and nothing else. Summary cards at the top show part count, panel area, banding length and groove length.
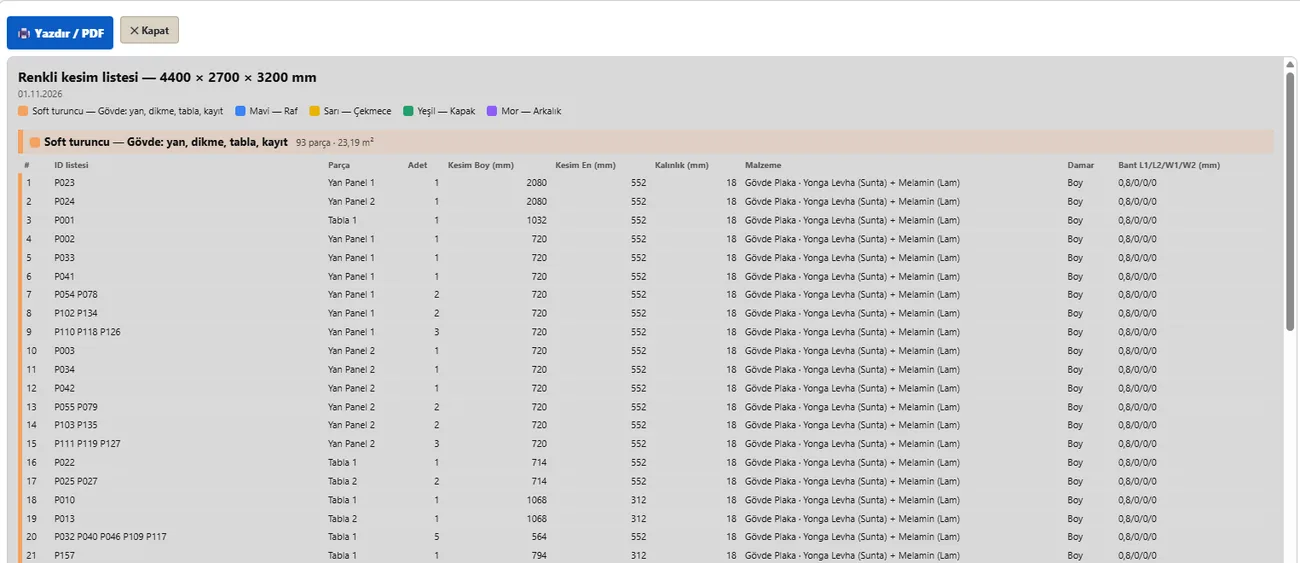
The list exports as CSV that opens in Excel, or as a landscape A4 PDF. The color cut list groups carcass, shelves, drawers, doors and backs by color, so whoever sorts parts after cutting can grab the yellow section and pull only drawer parts.
How do edge banding and grain direction show up?
Edge banding, the PVC strip applied to a part's visible edge, changes the cut size directly. In Production Settings you choose Net, and band thickness is deducted from the cut size, or Gross, and it is not. You set thickness separately for carcass, doors and hidden edges. Change a value and every cut size in the list is recalculated. Banding is listed for all four edges, and the program knows that membrane, lacquer, solid wood and compact panels get no banding.
Grain direction, the way the wood pattern runs along the part, has its own column and is printed on the label. In the cutting plan, grained parts are not rotated by default; on plain material, turn on Free rotation and parts can turn 90°.
From list to sheet: sheet nesting and the cutting plan
Once the list is done, the next step is sheet nesting, laying parts out on the sheet with as little waste as possible. In the Cutting Plan window you enter sheet size, blade kerf, edge trim and tool count; the program draws an automatic sheet layout showing which part sits on which sheet, yield percentage and a waste summary. Sheet drawings export as PNG or PDF. You can also keep offcut stock per material and deduct it after cutting.
If your shop runs a CNC router, the same parts go straight to the machine; we cover the export to CNC step and its outputs on the CNC cabinet software page.
Labels, door orders and revisions
Part labels print at 50 × 30 or 70 × 40 mm with a barcode, banding diagram, grain mark and QR code. The installer sees from the label which cabinet the part belongs to and where; a separate module label is available per cabinet.
If you buy doors from an outside shop, Cut List › Door order gives you a separate list. Non-panel items such as hinges, slides and handles come out as a hardware list. If the customer changes something after the job is in production, only the changed parts are listed; a broken part can be found by its code or QR code and sent back to cutting. See instant cut list and worktop dimensions for worked examples.
Free trial and the online calculator
There are two ways to get to know the program. The first is the free online cut list calculator: nothing to install, type in sizes and see how the list works. The second is the 5-day free demo: design, 3D, rendering and project saving are open; cut list, cutting plan, labels and CNC outputs are in the full version. For current terms, see the price page.
FAQ
Can I open the cut list in Excel?
Yes. The list downloads as a semicolon-separated CSV and opens with special characters intact. The same list is also available as a PDF.
Is the cut list available in the demo?
No. The demo opens design, 3D and rendering; cut list, cutting plan, labels, DXF and NC are in the full version.
Is edge banding deducted from the cut size?
You decide: with Net, band thickness is deducted; with Gross, it is not. The setting applies to the whole list at once.
Is it useful if I don't have a CNC?
Yes. The cut list, cutting plan and labels work just as well in a shop that cuts on a panel saw; CNC outputs are a separate step.